


What is TP4056 module?All You Need to Know
What is the TP4056 Module?
Exercising the TP4056 IC, a specialist lithium ion battery charger regulator, the TP4056 module is a small and affordable battery charger board. It's intended to charge single-cell lithium polymer or lithium ion batteries via USB or an external power source. The whole charging process is controlled by this module. This guarantees that the battery is charged effectively and safely without requiring a lot of additional parts or circuitry.

Key Features and Specifications
- Input Voltage: Accepts voltages from 4.5V to 5.5V, which are often provided via Type-C or micro USB connectors.
- Charge Current: Adjusted using a resistor integrated in Although it can be changed, 1A is the default setting.
- Charging Algorithm: CC/CV( constant current/ constant voltage) charging is an applicable fashion for lithium ion batteries.
- Protection Features: For enhanced safety, there is short-circuit and over-discharge protection.
- Status Indicators: To show the charging status( similar as charging or completely charged), there's an LED light.
- Thermal Regulation: Integrated thermal control to stop the device from overheating when charging.
- Package and Size: Has a compact format. This makes integration with other technological gadgets and projects easier.
- Other Features: Protection against reverse polarity and low standby current. and a great degree of charging precision.
Components of the TP4056 Module
TP4056 IC:
Key elements of the module is charge of overseeing the charging procedure. To guarantee a secure and effective charge, it regulates the voltage and current sent to the battery. The integrated circuit contains functions to prevent overcharging, regulate heat, and perform proper charge termination.
Protection Circuitry:
Contributes to the continuity and safety of batteries and modules. By keeping the battery from being charged above its maximum capacity, this avoids overcharging. Damage from unintentional short circuits can be avoided with the use of short circuit protection. The battery can not overdischarge, however, thanks toover-discharge safeguards.
Indicator LEDs:
Gives a visual indication of the charging status Essentially, there are two LED lights: one for charging indications. A completely charged battery is indicated by two lights, one of which is often red. (Typically, green or blue) The user can simply keep an eye on the charging process thanks to these LED lights.
Micro-USB or Type-C Input:
This connector makes it simple to utilize the module with a standard USB charger, power bank, or computer USB port by enabling it to be linked to a USB power source. Depending on the particular module model, Micro-USB or Type-C can be chosen; Type-C provides a more contemporary and flexible connection option.
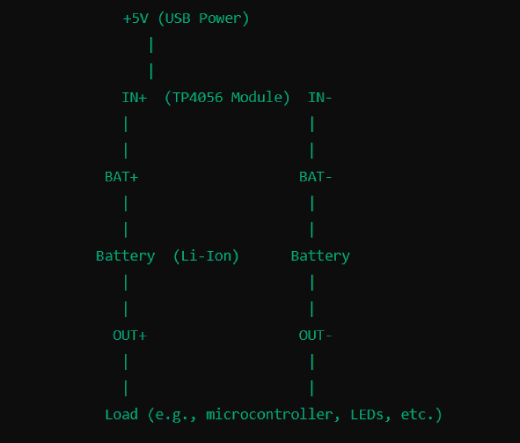
Pinout
-BAT+ and BAT-: Attach to the battery's positive and negative terminals.
-IN+ and IN-: Attach to the power supply's positive and negative terminals (typically 5V).
-OUT+ and OUT-: During battery charging, these pins are connected to a load that can receive electricity straight from the battery.
Working Principle
How the TP4056 Module Charges Batteries
The TP4056 module regulates the voltage and current supplied to the battery in order to oversee the charging process. It aids in making sure the battery is charged effectively, safely, and to its maximum capacity without going overboard. This module allows the attached lithium ion battery to be charged under control by connecting it to a power supply by Micro USB or Type C input.
Stages of Charging
Constant Current (CC) Stage:
The TP4056 module gives the battery a steady current in this initial stage. Usually set to a default value (such 1A), the current can be changed by adjusting the on-board resistor's value. The battery voltage will progressively rise during this process.
Constant Voltage (CV) Stage:
The module switches to a constant voltage level when the battery voltage hits a predefined threshold, which is typically 4.2V for a single-cell lithium-ion battery. The module keeps the voltage constant in this step, allowing the charging current to progressively rise. As the battery gets closer to its maximum capacity, it falls. In addition to helping to securely charge the battery, this stops overcharging.
Trickle Charge (or Taper Charge) Stage:
The Module cuts off its current at a very low level when the battery is almost fully charged. Sometimes this procedure is referred to as trickle charging. It will guarantee that the battery is stress-free and fully charged. The TP4056 integrated stops charging when the current falls below the designated threshold, at which point the battery is deemed fully charged.
Applications of the TP4056 Module
-Portable electronics
-DIY battery packs
-Battery management systems
-Power banks
-Solar chargers
Examples of Projects Utilizing the TP4056
1. DIY Solar Power Bank: A design that makes use of a solar panel and TP4056 module to produce a solar-powered movable power bank.
2. LED Flashlight: Using a rechargeable lithium-ion battery and a TP4056 module, this design produces a flashlight that can be accessibly charged via USB and has a long battery life.
3. Arduino-Based Gadgets: Arduino-grounded systems, similar rainfall stations. The TP4056 module powers and charges the battery for the GPS shamus and data jack.
4. Portable Audio Amplifier: Rechargeable lithium ion batteries power this little amplifier, which also has a TP4056 module for simple USB charging.
5. Emergency Backup Power Supply: A design that builds a provisory power source for cellphones and other essential bias by combining the TP4056 module with a sizable lithium ion battery. during a knockout.
Advantages of Using the TP4056 Module
- Efficiency and reliability
- Built-in protection features (overcharge, over-discharge, short circuit)
- Ease of use
How to Use the TP4056 Module(Step-by-Step Guide)
1. Connect Power Source: The TP4056 module's Micro-USB or Type-C connector should be connected to an appropriate power source, such as a USB charger, power bank, or computer USB harborage.
2. Connect Battery: Assemble the lithium-ion battery by connecting its positive and negative connections to the corresponding outstations on the TP4056 module. To prevent harm, confirm that the polarity is accurate.
3. Adjust Charge Current (Optional): If desired, adjust the charging current by changing the value of the onboard resistor. Lower values result in higher charging currents.
4. Monitor Charging Status: Pay attention to the TP4056 module's status LED. Generally, when charging is underway, a blue or green LED shows that it's finished.
5. Disconnect When Fully Charged: Upon reaching full charge of the battery. To stop the TP4056 module from overcharging, disconnect the power source.
Example:
An illustration of how to connect and charge a lithium ion battery using the TP4056 module is as follows:
The performance and dependability of the TP4056 module are excellent. For a variety of electronic projects, this makes it a great option for charging single-cell lithium-ion batteries.
Tips for Optimal Use
1. Use High-Quality Components.
2. Proper Ventilation.
3. Avoid Extreme Temperatures.
4. Monitor Charging.
5. Avoid Deep Discharge.
6. Use Proper Charging Current.
Troubleshooting Common Issues
1. LED Indicator Not Working: Corroborate that the TP4056 module and the battery or power source are connected. corroborate that all connections are tight and that the opposition is accurate.
2. Charging Slowly: Make sure the battery's charging current is set meetly. and confirm that there's enough current available from the power source. Make that there are no loose connections or resistance in the charging circuit.
3. Overheating: Make sure there is enough airflow. and keep an eye on the TP4056 module's temperature while it charges. Reduce the charging current or enhance airflow if the module is overheated to avoid overheating.
4. Charging Interruptions: Examine the electrical force for any dislocations or loose connections. Corroborate that the power force is steady and that the TP4056 module is securely attached to the battery and power force.
5. Battery Not Holding Charge: if there is no charge in the battery. This can be a sign of a failing battery or gradual deterioration. Consider getting a new battery from a reputable manufacturer to replace the old one.
Conclusion
A small, versatile battery charging board for single-cell lithium ion or lithium polymer batteries is the TP4056 module. The entire charging process is controlled by the integrated circuit TP4056. Constant current level, constant voltage, and trickle charge level Overcharging prevention is one of the built-in safety features of this module. protection against short circuit and over discharge guarantees effective and safe charging. It works with most standard power sources. Its small form factor that enable it to be used in a range of electronic applications and projects.
Final Thoughts
For those who are interested in electronics, the TP4056 module is an essential tool. For systems involving the charging of lithium-ion batteries, its intertwined protection, performance, and responsibility make it the perfect choice. from renewable energy sources to movable electronics and do-it-yourself widgets. The TP4056 module's versatility and ease of use free up generators to concentrate on the functional aspects of their work. Additionally, it ensures dependable and secure battery charging. The TP4056 module offers performance, ease, and peace of mind when charging your batteries, regardless of your level of skill with electronics—whether you are a novice experimenting with devices or an expert engineer creating intricate systems.
Related Articles
Dual In-Line Memory Modules(DIMM): Advancements and Applications
Comparison of ESP8266 Modules: ESP-01, ESP-05, ESP-12, ESP-201


