


How to Use a GFCI Tester for Safe Electrical Outlet Checks
Introduction to GFCI Outlets
GFCIs (Ground Fault Circuit Interrupter outlets) are installed in houses and commercial buildings for safety reasons. The main job of circuit breakers is to sense when a ground fault happens and then switch off the electricity to protect people from electrocution. Such devices track the electricity through a circuit and cut off the power instantly whenever as little as 4–6 milliamps are lost.
Since GFCIs can prevent electric shock, the National Electrical Code (NEC) makes them mandatory in areas where water and electricity may meet. All areas to be covered are bathrooms, kitchens, laundry rooms, garages, basements and exterior receptacles. If these systems are in good condition, they could prevent a crash.
So, we need to resort to using a GFCI tester. It allows you to examine the outlet’s wiring and guarantee that its protection devices work well. Seat belts are easy to use, but their safety impact is really important.
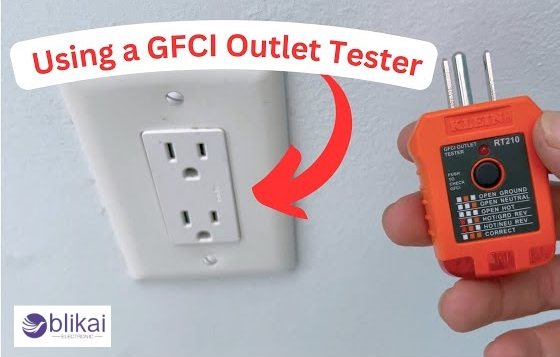
What Is a GFCI Tester and How Does It Work?
A GFCI tester serves to test if a GFCI outlet is wired practically and if it can detect faults. The plug is usually followed by indicator lights and a test button that is part of it. Once you connect the tester to an outlet, it looks at the wiring and provides the result using a pattern of lights.
The tester simulates a ground fault by sending a small amount of current from the hot wire to the ground wire. Pressing the test button on the GFCI outlet should result in power being cut off right away. A failure is indicated when the tripper isn’t tripped.
A normal outlet tester does not have the same functions as a GFCI tester. Both kinds of testers seem alike, but only a GFCI tester can tell if the circuit is safe from ground faults.
Preparing to Test a GFCI Outlet
You should attempt to protect yourself and the electrical system in your home by using safety measures before using a GFCI tester.
1. Turn off high-powered devices: Shut off and unplug major appliances in the circuit if you want to make sure nothing is affected during the test.
2. Inspect the outlet: Check for any physical dents, burns or water near the outlet. If there are cracks or the outlet feels wobbly, don’t go ahead and contact an electrician licensed to work on electrical systems.
3. Know your circuit: Be certain to check if the outlet is part of a GFCI-protected circuit or if it is the main GFCI outlet. If your outlet isn’t GFCI, an outlet further down the wiring may be, and you’ll need to find that.
4. Gather your tools: GFCI testing only requires a GFCI tester. Present-day testers usually work without using batteries or extra power.
Step-by-Step Guide to Using a GFCI Tester
To use a GFCI tester, follow the correct steps to be certain nothing is overlooked, and you remain safe. Let me explain the steps one by one:
Step 1: Plug in the Tester
Insert the tester directly into the outlet you want to check. The indicator lights will immediately illuminate in a specific pattern.
Step 2: Interpret the Initial Light Pattern
Most testers have a label or chart printed on them to help you interpret the lights. Common conditions the tester can detect include:
- Correct wiring
- Open ground
- Open neutral
- Open hot
- Hot/ground reversed
- Hot/neutral reversed
Avoid doing the test if you see faulty wiring. Any outlet that is wired incorrectly can be very dangerous and needs to be fixed by a professional electrician.
Step 3: Press the “Test” Button
When the wiring is correct, press the GFCI test button on the tester. The current is rerouted from the hot to ground wire to generate a ground fault.
An outlet with a GFCI should trip to cut off power within a small amount of time. A clicking noise will mean the tester is shutting down, and the indicator lights are out.
Step 4: Check the Reset Function
When the outlet trips, push the “Reset” button on the outlet. It recovers energy. If the reset function works, all the indicator lights on the tester will go back to their original state.
If any of these happen, such as a tripped outlet that does not reset or cut off power, it is time to take care of the problem.
Common Test Results and Troubleshooting Tips
The GFCI tester gives you immediate visual feedback. Here's how to interpret common results and what to do next:
Correct Wiring
What it means: The outlet is safe and wired correctly.
What to do: Press the tester's button to simulate a ground fault. If it trips, the outlet is fully functional.
Open Ground
What it means: The ground wire is missing or disconnected.
What to do: This outlet is not safe for grounded appliances. Have an electrician correct the wiring.
Open Neutral
What it means: The return path for the current is missing.
What to do: This is dangerous. The circuit cannot complete properly, so stop using the outlet.
Reversed Hot/Neutral or Hot/Ground
What it means: The wires are connected incorrectly, which can cause electric shock or equipment damage.
What to do: Have the wiring corrected immediately.
GFCI Fails to Trip
What it means: The safety mechanism is not working.
What to do: Replace the GFCI outlet as soon as possible. It no longer offers protection.
If you're unsure how to interpret the lights or results, consult the user manual or bring in a licensed electrician.
When and How Often to Test Your GFCI Outlets
Testing your GFCI outlets regularly ensures they continue to protect you and your household. Here's when you should check them:
Monthly Testing
The NEC and outlet manufacturers recommend testing every month. This may seem frequent, but it’s a quick and easy habit that can prevent electrical accidents.
After Storms or Power Surges
Following any lightning strike, power outage, or nearby electrical surge, retest your GFCI outlets. Surges can damage internal components.
Before Using Outdoor Outlets
Be sure to test the GFCI outlet before you connect things like lawnmowers, hedge trimmers or pool pumps, mainly if the outlet isn’t protected from the weather.
As Part of Home Maintenance
Include GFCI testing in your seasonal safety checklist. Test before the start of summer and winter when electrical loads tend to increase.
Advantages of Regular GFCI Testing
The benefits of routine GFCI testing go beyond peace of mind. It’s a small act with significant long-term advantages:
1. Shock Prevention
The primary purpose of a GFCI is to protect you from ground faults—potentially fatal shocks. Regular testing ensures the outlet will respond as designed in an emergency.
2. Fire Risk Reduction
Faulty outlets or improper wiring can spark electrical fires. Ensuring your GFCIs work adds an important layer of protection.
3. Code Compliance
For landlords, property managers, and business owners, maintaining functional GFCI protection is part of building code compliance and can help avoid legal issues.
4. Appliance Protection
A working GFCI prevents damage to sensitive equipment and electronics by shutting down power quickly during faults.
5. Cost-Effective Safety
A GFCI tester costs less than $20 and takes under a minute to use. Compared to the cost of electrical repair—or the consequences of an injury—it’s an easy investment in safety.
Conclusion and Safety Reminders
GFCI tester tests are easy and maintain the protection of your home. With them, you can confirm your wiring is correct and keep unexpected dangers from happening.
To recap:
- Always test your GFCI outlets monthly or after any electrical event.
- Follow the correct steps to simulate a fault and verify that the outlet trips and resets properly.
- Take any abnormal results seriously—especially failure to trip or incorrect wiring.


