


How to Properly Use and Maintain Your Battery Terminal
A battery terminal is an essential electric connection point to which a battery is connected to the device or system that it will be powering. These terminals usually consist of conductive metals such as lead, brass or copper, and they enable electrical current to flow off of the battery and into the circuit.
Under the automotive and electrical systems, the battery terminals serve as the primary points of entry of current that exists between the battery and the component devices powered by the battery. On automobiles, this extends all the way to the starter motor, alternator, infotainment system and onboard diagnostics. In marine or RV applications, terminals ensure reliable power distribution across essential systems. This flow can be interrupted by a poor quality terminal or a corroded terminal, resulting in power drops, difficulty starting or even system failure. Therefore, we need to use and maintain high-quality battery terminals.
How to Properly Use Battery Terminals
Find out what type of battery: an SLA (sealed lead-acid), AGM, deep-cycle marine or a lithium-ion?
Vehicle batteries usually have SAE (Society of Automotive Engineers) screw-down type posts, and marine batteries may have two posts, fish finder or trolling motor-compatible dual-post SAE and 5/16-inch threaded posts.
Applications with a high current, such as an astronomy battery bank or a solar/RV battery bank, might require ring terminals or a large extra-thick-gauge-wire lug of a higher current rating.
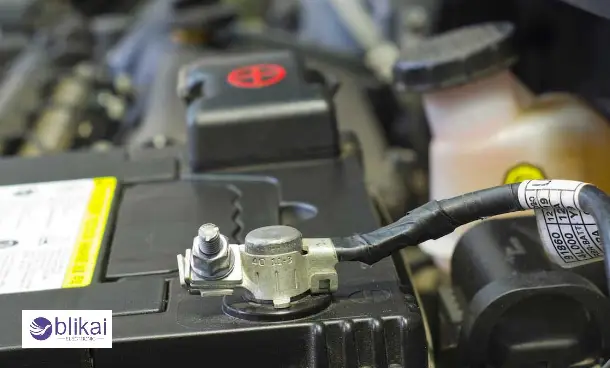
Correct Installation Procedures
Start by powering off everything relating to the battery. In case of vehicle systems, the ignition key should be removed, and at least 10 to 15 minutes should be allowed in order to wait for the dissipation of residual charge. To avoid potentially short-circuiting the unit, disconnect the negative (-) terminal first whenever working on a unit. Take old terminals off with a battery terminal puller; when the old terminals are stuck, use a screwdriver, but do not pry them off, as this will damage the post or create a spark.
Necessary Tools
- Adjustable wrenches or socket sets (size to the sizes of your terminal bolts, normally 10mm or 13mm)
- Battery terminal puller, specifically suited to pulling stuck or corroded terminals
- Terminal cleaning brush or reamer for internal and external cleaning
- Multimeter or voltmeter to test terminal voltage and system continuity after installation
- Torque wrench for precise clamp tightening without overstraining the post
- Cable crimper (if replacing or customizing terminal ends)
- Nitrile gloves and safety goggles, particularly when handling lead-acid batteries, as exposure to acid is a risk
- Anti-corrosion washers (usually felt pads impregnated with inhibitor) and either Dielectric grease or Petroleum jelly with which the connections may be sealed are optional but advisable.
Connection Instruction Manual
- Disconnect all loads from the battery and make the area well ventilated.
- Remove the negative terminal, then the positive one. This sequence decreases the possibility of sparks in case a wrench slips and touches the frame.
- Apply lots of scrape with a terminal brush or post cleaner until the posts and cable ends are clean and bare metal shows.
- Attach the positive terminal (+) first when reconnecting. Slide or bolt it down until it sits flush with the post, ensuring there is no gap.
- Screw the terminal clamp to spec (torque wrench is preferred, but don't provide excessive elbow grease; otherwise, one risks damaging the battery post or terminal.
- Connect to the ( - ) as above.
- Put dielectric grease or a corrosion-inhibiting spray on the post and terminals.
- Install terminal covers if present, to prevent accidental shorting against metal tools or components.
- Test with a multimeter: the voltage across the terminals should match the battery’s rated voltage (e.g., 12.6V for a fully charged 12V battery).
Making the Connections Power Free and Tightly Connected
The loose terminals might become high resistance points and cause voltage drop, arcing and even thermal damage to the connection. Even a slight increase in resistance can cause a system failure in a high-demand system such as a winch, amplifier, or outboard motor. On installation, it must always be ensured that the terminal is immovable when wiggled lightly by hand. Where possible, issue a torque wrench; this is necessary where a hand-tightened clamp can loosen with time due to the vibration of the vehicle. On inspection, observe visually the connection to ensure there are no gaps between the post and the terminal, which may become an avenue of oxidation or arcing. There can be locking terminal nuts / anti-vibration washers when off-road offshore.
Also, they should have regular inspection intervals, monthly on systems with high loads, quarterly in low-demand systems, including voltage testing under load. A healthy connection indicates a low voltage drop (less than 0.2V) when it starts up or when the system pulls loads.
Tips on Maintaining Battery Terminals
Routine Inspections (Visual Inspections, Tightness Tests)
You should at least inspect the terminals visually every month; more frequently in severe conditions, and look over the terminals to find any evidence of corrosion, like white, green, or blue powdery material around the post and clamp. Also, examine whether there is discoloration, cracking, or bulging of terminal material. Twist each terminal by hand with a gloved finger; any observable motion is a sign that it is not tight enough and may lead to voltage drop or intermittent connection.
To get more technical, a multimeter may be used to see a drop in voltage at the battery post to the terminal end on startup. A voltage change of above 0.2 volts can indicate a bad connection. Even brief and fast checks at their specific time can identify warning symptoms and even avert larger electrical problems in the future.
The Methods of Cleaning to Eliminate Corrosion and Buildup
The first step to clean is to help out this battery by first pulling the negative (-) cable and then the positive (+) cable. Put on gloves and eye wear, then go ahead. Then begin by physically cleaning either a battery terminal cleaner tool or with a wire brush to remove any loose corrosion on both the terminal and post. In the case of more resistant dirt, wipe the place with a cleaning fluid and scrub. Make sure you clean the terminal clamp inside as well as the battery post outside because there might be a coat of corrosion not visible but still impeding the current flow. Rinse using distilled water, to wash using clean water after cleaning and thoroughly wipe with a lint-free cloth. High-pressure water and steel wool should never be used since they may destroy the battery or make it contaminated with additional contaminants.
Typical Household Cleaning Supplies (Baking Soda, Vinegar, Household Cleaners)
The most effective and budget-friendly cleaning agent for battery terminals is a baking soda and water solution—about one tablespoon of baking soda per cup of warm water. To neutralize the corrosion induced by acids, apply it with a terminal cleaning brush or toothbrush. Deposits of acid would be fizzingly broken down on many occasions. An alternative is white vinegar, which should work on mild oxidation and mineral deposits. All you need to do is soak a piece of cloth in vinegar and stuff it around the terminal for a couple of minutes and scrub it.
To simplify, or where trivial cleaning is necessary, commercially produced cleaners in aerosol can be employed, most commonly with a marking system, to ensure afterwards that the corrosion has been neutralized, which in this case normally takes the form of one of the colors changing.
Conclusion
Other measures such as routine checking, good cleaning and prevention of corrosion are also inexpensive measures, but their payout is attractive, in the form of greater reliability and extended battery life. When such problems manifest themselves, troubleshooting your system and knowing when to change worn terminals in the system comes in handy so as to be able to have a smooth-running system.
Related Articles
What Is Optimized Battery Charging? Advantages & How It Works
Different Types of Battery Chargers: How Do They Differ?
Battery Testers: What You Should Know!
Some images are sourced online. Please contact us for removal if any copyright concerns arise.


