


GFCI Outlet Installation: TR, WR, and Panel Setup Guide
Introduction to GFCI Outlets
GFCI outlets are created to shield people from electric shock in the event of ground faults or leakages. Unlike other outlets, GFCIs watch for differences in current between the hot and neutral wires and interrupt the power within 1/40 of a second when an imbalance happens. This fast reaction reduces the risk of injury or electrocution, mainly in spots where there is contact between water and electricity. Many installations are carried out in bathrooms, kitchens, garages, laundry rooms and areas outside the home. Various types of GFCI devices exist, such as Tamper-Resistant TR, Weather-Resistant WR receptacles and panel-mounted GFCI circuit breakers. Learning about these options is important for a safe and code-approved electrical system.
GFCI Safety Standards and Code Requirements
Where there is a risk of electrical shock from moisture or grounding, GFCI is required by the NEC. Bathrooms, kitchens, crawl spaces, unfinished basements, garages, laundry areas and all outdoor outlets are all part of this.
As per NEC, now all outlets that can be reached by children in residential areas must be TR (Tamper-Resistant) outlets. The special shutters in the springs keep foreign things from going into the outlet, which makes it childproof.
Any area that is wet or exposed to the weather needs WR outlets. Because they are made from materials able to resist corrosion, UV degradation and water, these outlets can survive and work properly in difficult places.
Panel-mounted GFCIs go inside the electrical service panel and safeguard an entire branch circuit. This feature is especially practical in basements and garages since many devices can be turned on at once.
Tools and Materials Needed for GFCI Installation
You should get all the needed tools and materials before you start the installation. This way, workers can do their jobs safely and in good order without any interruptions.
Essential Tools:
Voltage Tester – To verify that power is turned off before touching any wires.
Flathead and Phillips Screwdrivers – For removing faceplates and securing wires to terminals.
Wire Strippers – For exposing the copper conductor of electrical wires.
Needle-Nose Pliers – To shape wires and make precise connections.
Required Materials:
GFCI Receptacle – Choose based on environment: TR for indoors, WR for outdoors.
Weatherproof Box and Cover (for WR GFCI) – Keeps moisture and debris out.
Electrical Tape and Wire Nuts – For securing wire connections and insulation.
Wall Plate – Optional decorative or gasketed plates for sealing.
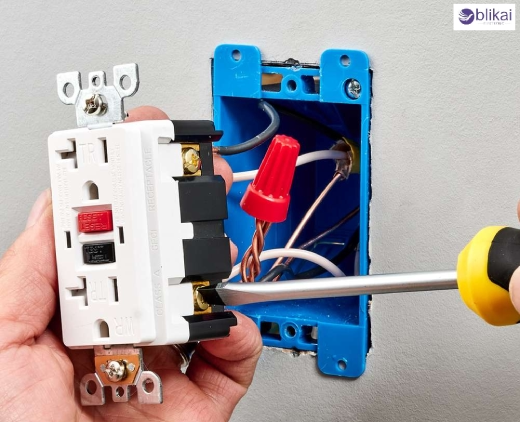
Step-by-Step Guide to Installing a TR GFCI Outlet
The same ground fault protection as a regular GFCI is available in Tamper-Resistant GFCIs, which also include a shutter mechanism inside. Equipping these shutters with pressure-sensitive prongs helps stop children from putting anything like keys or paperclips through them.
Installation Process:
1. Turn Off Power: Look for the circuit breaker that serves the outlet and switch it off. Be sure to use a voltage tester to show that power is not present in the outlet.
2. Remove the Old Outlet: Open the cover plate and outlet, remove them gently and look at the wiring inside the outlet.
3. Identify Terminals: TR GFCIs have clearly marked LINE and LOAD terminals. The LINE terminal connects to the power source. If the outlet is protecting others downstream, connect those wires to the LOAD terminals.
4. Connect Wires: Attach black (hot) and white (neutral) wires to the correct terminals. Secure ground wire (green or bare) to the green screw.
5. Mount the Outlet: Carefully tuck the wires into the box and screw the outlet into place. Attach the wall plate.
6. Restore Power and Test: Turn the breaker back on and press the TEST button. The outlet should trip and shut off power. Press RESET to restore functionality.

Installing a WR GFCI Outlet for Outdoor Use
Outside, GFCI outlets deal with unusual hazards such as rain, increasing humidity, snow and UV radiation. They can deal with these situations by being built with sturdy plastic cases and corrosion-protected internal components.
Installation Tips:
1. Use a Gasketed, Weatherproof Box: For new installations, select a box rated for outdoor use with a sealable back and front.
2. Install an In-Use Cover: The covers still stay closed after adding a plug, so your device is always well protected.
3. Seal All Entry Points: Seal the wall area where the junction box meets it with silicone caulk, which will keep water out.
4. Mount Correctly: Make sure the downspout points slightly downwards so water does not gather up along the roof.
5. Test After Installation: Power the outlet and press the TEST button to ensure the GFCI feature is working properly.
Panel-Based GFCI Breaker Installation
Protecting a circuit can be easier by using a GFCI breaker in the service panel rather than putting GFCI receptacles in each outlet. This solution is most useful in places with more than one exit or entrance, for example, garages and basements, making sure everything is secured with one control.
Steps:
1. Turn Off the Main Breaker: Shut off all power to the panel before opening it.
2. Remove Panel Cover: Use caution; even with breakers off, the service lugs may remain energized.
3. Install the GFCI Breaker: Snap the breaker into the appropriate slot in the panel.
4. Connect Hot Wire: Attach the circuit’s black (hot) wire to the breaker’s hot terminal.
5. Connect Neutral Wire: Connect the white (neutral) wire to the breaker’s coiled pigtail, which is then connected to the panel’s neutral bar.
6. Close the Panel and Label the Circuit: Turn the power back on and label the new GFCI-protected circuit for future reference.
Common GFCI Installation Mistakes and How to Avoid Them
There is still a chance for DIY experts to make mistakes while installing GFCIs. Common problems that developers face and how to prevent them are explored below:
Reversing LINE and LOAD terminals: This is the most frequent mistake. It turns off downstream protection and causes the GFCI to malfunction.
Overstuffed Electrical Boxes: Too many wires can overheat the box and cause short circuits. Use a box with the proper cubic inch capacity.
Improper Grounding: Forgetting to connect or secure the ground wire is a safety hazard.
Using Standard Plates Outdoors: WR GFCIs require in-use, weatherproof covers to remain code-compliant.
Skipping the Test Phase: Always test the outlet or breaker before use to confirm functionality.
How to Test and Maintain GFCI Outlets
Regular testing of GFCI outlets is necessary to keep them operating properly all the time. Manufacturers advise homeowners to routinely check the burglar alarm every month in case the protection has failed due to wear or power fluctuations.
How to Test:
Built-in Test Button: Press the TEST button. The RESET button should pop out, and power to the outlet should be cut. Press RESET to restore power.
GFCI Outlet Tester: Plug a tester into the outlet and press the test button. If the GFCI trips, it is functioning. These testers also diagnose miswiring and grounding issues.
Troubleshooting GFCI Issues After Installation
Common GFCI Problems:
GFCI Won’t Reset: This can happen if there is no power at the LINE terminals, a ground fault still exists, or the outlet was miswired.
Frequent Tripping: Caused by moisture in the box, faulty appliances, or overloaded circuits. Try disconnecting the LOAD side to isolate the problem.
Outlet Appears Dead: It could be controlled by another GFCI or protected by a GFCI breaker. Check upstream devices and breakers.
Conclusion
GFCI outlets are necessary for ensuring electrical safety at home as well as in offices, stores and other sites. TR outlets are installed indoors to prevent accidents in children’s hands, while WR outlets outside make sure your electrical system will last. When you have several devices to protect, a panel-mounted GFCI breaker will do the job.
Long-term safety and soundness of your electrical installation come from using correct installation methods, sticking to NEC and checking each device regularly. In case you face any uncertainty, a roofer or contractor can help you handle the issue safely and effectively.


