


How to Replace a Broken 9V Battery Connector
Have you found that, despite possessing a fully charged battery, your electronic device suddenly died without warning? A broken 9V battery connector could be responsible. While this seemingly minor component could render your devices useless, don't rush off to the repair shop! Instead, wait a bit.
Replacing a 9V battery connector at home requires only basic tools and guidance from professionals, providing you with all of the information you need for success. We will guide you step-by-step in rejuvenating any of your devices - be it multimeters, smoke detectors or vintage guitar pedals. From gathering tools to testing completed repairs - this guide can save both time and money while teaching valuable repair skills! Let's dive right in - here is everything we have for replacing troublesome connectors!
What is a 9v Battery Connector?
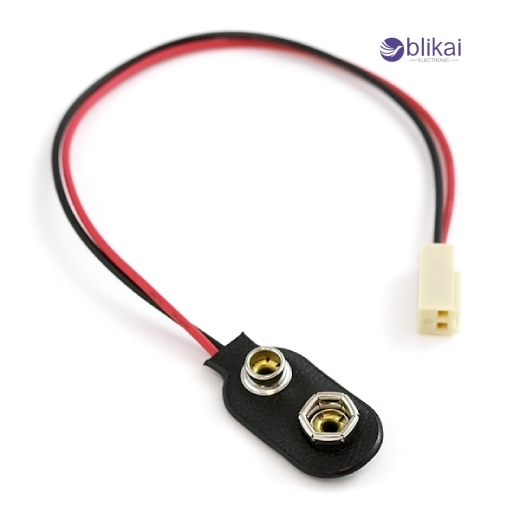
A 9V battery connector is a device used to connect a 9-volt battery to an electronic circuit. Snap connectors are commonly used because their terminals snap onto the respective terminals on a battery; typically these leads include red (positive) wire and black (negative), making easy integration possible into various circuits and devices.
How to Replace a Broken 9V Battery Connector
Essential Tools for the Replacement:
- Soldering iron and lead-free solder
- Wire strippers
- Small needle-nose pliers
- Heat shrink tubing
- New 9V battery connector
- Helping hands or clamp (recommended)
- Multimeter
Safety Precautions When Working with Electronics:
- Work in a well-ventilated area
- Wear safety glasses to protect from solder splatter
- Keep a fire-resistant surface for soldering
- Unplug any connected devices
- Never touch the soldering iron tip
- Keep water away from your workspace
- Use a proper soldering iron stand
Identifying the Correct Replacement Connector:
- Snap-type or wire-lead connector options
- Match the polarity markings (red for positive, black for negative)
- Verify the connector size matches your application
- Choose between plastic or metal housing
- Check wire gauge compatibility
- Ensure proper current rating for your device
Removing the Old Connector
Disconnecting the Battery
Before starting any work, remove the 9V battery from the connector. This crucial safety step prevents any potential short circuits or electrical issues during the replacement process.
Detaching Wires from Old Connector
Carefully consider how wires are attached to an old battery connector, usually two colors: red (positive) and black (negative). With needle-nose pliers, gently grasp each wire near its connection point and pull away from the connector; or heat the joint until solder melts before carefully pulling away each one.
Cleaning the Wire Ends
Once the wires have been detached, remove any old solder, electrical tape, or debris from their ends. Use fine-grit sandpaper to gently polish exposed copper until it appears bright and shiny; for stranded wires, twist tightly together any exposed strands to prevent fraying.
Inspecting for Damage
Examine the exposed wire ends for signs of corrosion, breaks, or wire stress. Look for any discoloration, brittleness, or fraying along the wire insulation. If you notice any damage extending beyond the exposed portion, cut back the wire to reach clean, undamaged material. Ensure you leave enough wire length to comfortably reach the new connector.
Installing the New Connector
Positioning the Connector Correctly
Before soldering, ensure the new 9V battery connector is oriented correctly. The red (positive) wire should align with the larger terminal, while the black (negative) wire connects to the smaller terminal. Hold the connector at a 90-degree angle to ensure proper battery insertion later.
Soldering Techniques for Secure Connection
Start by tinning both the connector terminals and wire ends with a thin layer of solder. Heat the terminal first, then apply solder to create a small cone-shaped mound. Hold your soldering iron at a 45-degree angle and heat both the wire and terminal simultaneously. Apply solder to the joint, not the iron tip, allowing it to flow naturally. The result should be a shiny, smooth connection.
Testing Wire Connections
Before proceeding, gently tug each wire to verify the mechanical strength of the solder joints. Look for a solid, concave filet of solder around each connection point. Check for any stray wire strands or solder bridges between terminals that could cause shorts. The connections should appear smooth and professional, without any dull or grainy surfaces that indicate cold solder joints.
Testing and Troubleshooting
Initial Connection Test
Before fully reassembling your device, perform a basic connection test. Attach the battery to the new connector and use a multimeter to verify continuity. The connection should be firm and secure, with no wobbling or loose parts.
Common Problems and Solutions
If you encounter resistance issues, ensure all solder joints are clean and properly heated. Cold solder joints can cause intermittent connections. If the battery doesn't snap in properly, check the connector's clip tension - you can carefully bend it for a tighter fit. For connection problems, inspect for any stray wire strands that might cause shorts.
Checking Polarity
Carefully examine the polarity markings on both your connector and battery to ensure a correct connection: red wire must connect to positive (+), while black must connect with negative (-). Reversing this process could damage your device. Most 9V connectors have foolproof designs, but always verify before powering up.
Verifying Proper Voltage Output
Use a multimeter to test output voltage; an optimal 9V battery should read between 9.0-9.6 volts. If readings are significantly lower, either the battery is weak or there's resistance in the connection. Test multiple points along the connection to isolate any voltage drops.
Maintenance Tips
Preventing Future Connector Damage
To extend your 9V battery connector's lifespan, avoid pulling directly on the wires when removing batteries. Instead grip the connector body tightly and pull straight out. Also store devices in dry environments as moisture can increase corrosion rates. Consider using battery holders or cases for devices that experience frequent battery changes.
Regular Cleaning Practices
Keep your battery connectors in great condition by performing regular maintenance cleanings every 3-6 months with isopropyl alcohol and cotton swabs to remove corrosion or debris, before completely drying before reconnecting a battery. For stubborn oxidation, a pencil eraser can safely clean the metal contacts without causing damage.
Signs of Connector Wear
Monitor your connector for early warning signs of deterioration. Look for discoloration or green buildup, which indicates corrosion. Check for looseness in the connection - if the battery wobbles when connected, the clip may be losing its grip strength. Watch for cracking or brittleness in the plastic housing, and inspect the wire connections regularly for any signs of fraying or stress.
Conclusion
A broken 9V battery connector can be repaired with the right tools and approach, without professional assistance. By taking precautionary steps such as following safety protocols during each step - from removal to installation - you can restore its functionality on your own.
Be sure to regularly inspect the battery connectors on your devices for signs of wear and corrosion. Careful handling can extend their lifespan and help avoid future breakages; if in any doubt about any step during the replacement process, consult a professional in order to avoid potential damages to devices.
FAQs
Can I replace a 9V connector without soldering?
Yes, replacing a 9V connector without soldering is certainly possible using alternative connection methods such as crimp connectors, screw terminals or wire nuts - tools which allow secure electrical connections without needing a soldering iron. Another option is to use pre-assembled snap-on connectors with terminals designed for easy replacement. These methods are particularly useful if you do not have soldering equipment or want a faster, temporary solution. Just ensure all connections are properly secured and insulated to prevent short circuits or other electrical issues from occurring.
What should I do if the wires are too short to connect?
If the wires are too short to connect, you can extend them by splicing in additional lengths of wire using connectors like crimp sleeves, wire nuts or terminal blocks. For an optimal connection strip a small amount of insulation from both ends before joining them securely using electrical tape or heat-shrink tubing to insulate them as you join. Ensure that additional wire gauge matches those used originally as this will maintain circuit integrity. Pre-made wire extensions with connectors can also be purchased for convenience.
Are all 9V battery connectors universal?
Not all 9V battery connectors are universal, as they can differ in material quality, design, and intended application. Most standard 9V connectors feature snap-on designs that make them interchangeable in many basic applications, while some feature higher grade materials for durability or specific environments, and others may feature different wiring configurations altogether. Ultimately it is always best to ensure compatibility with your device's voltage polarity requirements as well as wiring needs to ensure safe and efficient operation.
Related Articles
Understanding Different Wire Connector Types: A Guide
What is RJ11 Connector & How it Work?
Network Cable Connectors: Types, and Applications
RJ45 Connector: Everything You Need To Know (Guide)
Isolator vs Switch Disconnector: What's the Main Differences?


