


Step-by-Step Guide to Replacing a Temperature Fuse
What Is a Temperature Fuse?
A thermal fuse, thermal fuse, or thermal cut- eschewal is a safety device precluding appliances from overheating. It causes the inflow of electric current through the fuse wire to be intruded during an unsupportable rise in the temperature to cut off the electricity and control the fire. Unlike an ordinary electrical fuse, a thermal fuse shields by the reactance of the fuse wire to an electric current; the latter reacts to increased temperature, leading to disconnection, with thermal fuses being a fundamental precaution in all domestic appliances.

Typical Applications in Household Appliances
The primary purpose of having temperature fuses in most household appliances is to cease the potential risk of fire hazards. You'll find these in:
- Hair dryers
- Coffee makers
- Clothes dryers
- Microwave ovens
- Dishwashers
- Electric irons
Signs of a Faulty Temperature Fuse
- The appliance suddenly stops working
- No power reaches the device even when plugged in
- The appliance works intermittently
- Unusual burning smells during the operation
Gathering Necessary Tools and Materials
Essential tools for the job
For a successful temperature fuse replacement, there are a few handy tools. A multimeter will assist you in checking the continuity of the fuse and connecting wires properly. A set of screwdrivers, flathead, and Phillips head types is required to access the fuse compartment and remove the covering from the fuse. Needle-nose pliers will allow you to carefully remove the old fuse and plug the new fuse in. If you have to make a wire connection and you need to expose some wire ends to do so, you may need wire strippers. Finally, just in case you might need them for making insulated connections, keep some electrical tape handy.
Choosing the correct replacement fuse
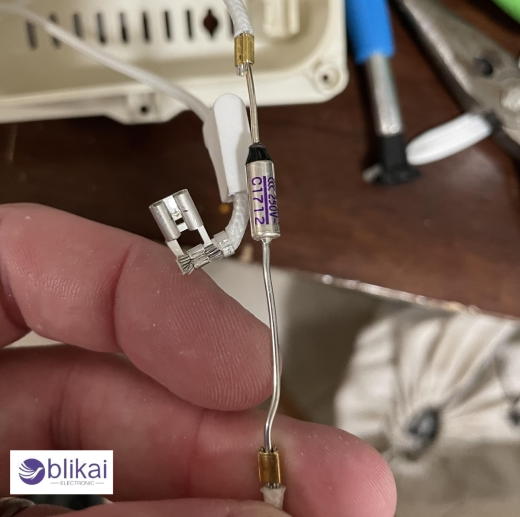
Choosing the correct fuse is essential for the effective and safe operation of your appliance. Check for the specification on its amperage rating and temperature threshold. Usually, the specification is imprinted either on the fuse itself or in the appliance manual. Ensure that the new fuse has the exact specifications as the old one. The amp rating and melting temperature should exactly match. Physical size should also be considered to ensure a proper fit of the fuse. If possible, take the old fuse along to have it checked and determine an appropriate substitute.
Locating the Temperature Fuse
Identifying the fuse in your appliance
Before you can replace a temperature fuse, you will need to find it in the appliance.
Accessing the fuse compartment
After correctly identifying where the fuse should be, you now need to gain access to the compartment holding it.
Documenting the original fuse position
Prior to the removal of the old fuse, take note of how the fuse is positioned. Take a clear picture or draw a detailed sketch demonstrating how the fuse is oriented and connected. This will work as a reference once you are installing the new fuse so that it is connected correctly. Needed to pay attention to the direction of the fuse and the placement of the wire leads around the fuse since the incorrect connection may lead to malfunctioning or becoming unsafe.
Removing the Old Temperature Fuse
A. Disconnecting power supply
Before you set out to remove the old temperature fuse, taking this safety measure would, in fact, keep you safe. Unplug the appliance from the outlet, and, if possible, vacuum the battery out. This is to prevent yourself from being parked upon or shocking yourself in case you accidentally touch the live wires while performing the repair.
B. Unsoldering or detaching the old fuse
You will remove the old temperature fuse after the power goes off. Remove it by either unsoldering or detaching it, depending on whether it is attached by soldering or by clips. If it is soldered, apply heat to the junctions with a soldering iron to desolder it, then remove it gently. If clips are used, hook them off with your needle-nose pliers. Be careful that no damage is inflicted upon surrounding components or wires during this procedure.
C. Cleaning the fuse area
With the fuse older, clean the area wherein it is attached. Clean the area where it was connected after removal using isopropyl alcohol and a soft brush or Q-tip to get rid of residue, dirt, or oxidation. This will provide a smooth surface that will favor the soldering of the new fuse, enhancing electrical contact and ensuring long-lasting repair. Let dry entirely prior to beginning the next phase of installing the new temperature fuse.
Installing the New Temperature Fuse
Positioning the new fuse correctly
When installing the new temperature fuse, one must position it properly for efficiency and safety. Carefully consider the orientation of the old fuse and where it is placed before you take it out. The new fuse must be put in at the same place on the same bus by those leads of the fuse. If the fuse has a polarity, also check with the direction of the fuse installation to avert malfunction.
Soldering or attaching the new fuse
Once mounted correctly, the new temperature fuse must be secured. Soldered original fuses should be soldered with the appropriate wattage of soldering iron and lead-free solder. Heat the connection points and introduce a small quantity of solder to form a good conductive connection. For crimp connections, please make use of crimp connectors of the correct size and crimp them with the hand crimping tool to secure them. In both cases, take care to avoid overheating the fuse and other surrounding components.
Double-checking connections
Once the connections are installed, it's time to double-check them. Inspect the solder joints or crimp connections with respect to lousy contact or looser attachments. Slightly pull the fuse to see if it's solidly bound. Use the multimeter to check for continuity across the fuse to confirm it's well integrated and working. The final inspection will assure you of the safety and reliability of your appliance or device.
Testing the Replacement
Reassembling the appliance
Once a new temperature fuse has been installed, be sure to reassemble the appliance correctly. Carefully set each component back into its original location so that no wires are pinched or risk damage. Tighten all screws and fasteners clearly. Become very aware of safety-critical parts such as grounding wires or insulation.
Performing a safety check
Before applying power to the appliance, conduct a comprehensive safety check. Check all connections for being securely connected and adequately insulated. Check for damage or wear that may have been missed previously. Check for proper continuity, and that resistance is ok across the new temperature fuse using the multimeter.
Running a test cycle
Once you are sure about the reassembled appliance and safety checks, conduct a test run. Power up the appliance and observe its working closely. Listen for unusual noises and pay attention to any sign of malfunction. Watch during a complete cycle to notice the temperature change and how the appliance works. If everything is carrying on as it should, then it would seemingly indicate a successful temperature fuse replacement.
Troubleshooting Common Issues
The fuse immediately blows again
If the newly installed temperature fuse blows again immediately after replacement, it generally points to a bigger problem that potentially exists. A faulty thermostat, short circuit, or even potential overheating problems could lead to such issues. Start by checking the thermostat for correct operation and calibration. If it's working great, then start checking the wiring for any signs of damage or exposed conductors leading to a short circuit.
The appliance is still not working
Several factors can lead to an appliance remaining inoperable even after replacing the temperature fuse. First, check for correct and firm connections of wires. Next, determine if other components such as the heating element or motor run well. The initial fuse failure could have signaled a more significant problem rather than the primary cause itself.
Unusual noises or smells
Never let strange noises or odors from the appliance slide after replacing the temperature fuse. Such could indicate faults with moving parts (bearings or motors) or electrical issues.
Conclusion
For everyday appliances, mastering a skill such as changing the temperature fuse is worth the time. You should follow the points in this guide, for you can now change a faulty temperature fuse easily, safely, and without calling in paid repairmen if the need arises.
Related Articles
Is a Fuse a Resistor? [Everything Explained]
How Does a Fuse Work? [Full Guide]
Impact of IRF3205 MOSFET on Power Electronics: Advancements and Applications


