


Getting Started with Arduino Leonardo Microcontroller
What we should know about Arduino Leonardo?
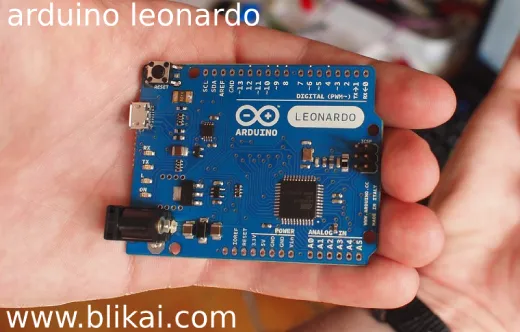
The Arduino Leonardo microcontroller serves as an example of the development of open-source hardware. Leonardo features a unique feature set tailored to the requirements of contemporary electronic applications. Leonardo is grounded on the ATmega32u4 microcontroller. Leonardo is different from its forerunners in that it has erected-in USB connectivity and can replicate mortal input devices like keyboards and mouse with ease. Its small size and dual digital and analog pinouts provide a multitude of options for prototyping various electrical systems, ranging from basic gadgets to intricate automation undertakings.
Key Features
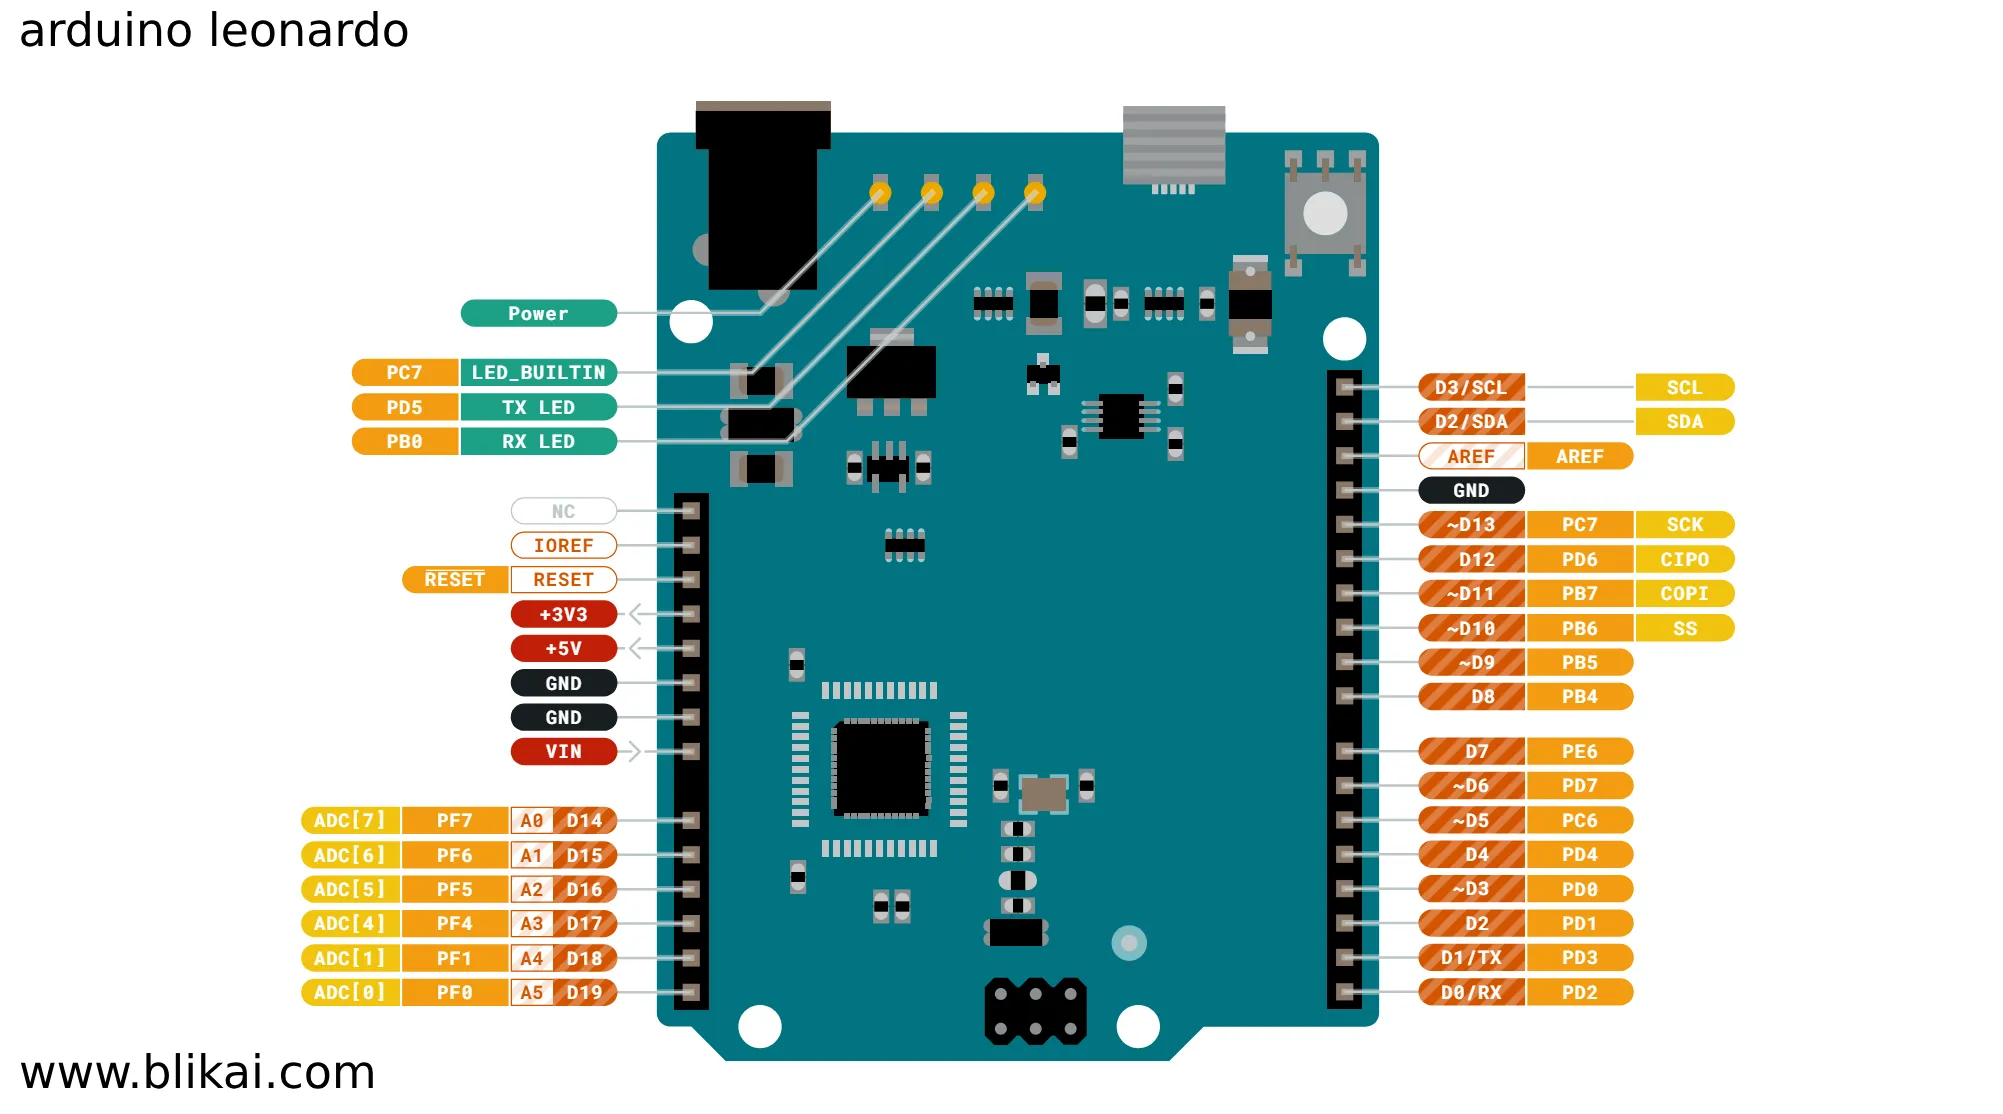
1. Microcontroller: ATmega32u4
2. Operating Voltage: 5V
3. Input Voltage (recommended): 7-12V
4. Digital I/O Pins: 20 (of which 7 can provide PWM output)
5. Analog Input Pins: 12
6. DC Current per I/O Pin: 40 mA
7. Flash Memory: 32 KB (ATmega32u4) of which 4 KB is used by the bootloader
8. SRAM: 2.5 KB
9. EEPROM: 1 KB
10. Clock Speed: 16 MHz
Pinout Diagram:
Unique Characteristics
- USB Connectivity: One of the primary characteristics that set Leonardo apart from other Arduino boards is its integrated USB connectivity feature. The ATmega32u4 does not require an additional CPU because it includes integrated USB communication. This enables the Leonardo to show up on the linked computer as a virtual (CDC) serial/COM port in addition to a mouse and keyboard.
- HID Capabilities: The Leonardo can be readily designed to emulate a USB HID (human interface device), such as a keyboard or mouse, thanks to basic USB communication.
- Different Bootloader: In order to support USB connectivity, the Leonardo board requires a different bootloader than previous Arduino boards, such the Uno.
Applications
Projects requiring the Arduino Leonardo to function as a human interface device (HID) will find the board to be especially helpful. Some common applications include:
- Custom keyboards
- Mouse emulators
- Game controllers
- MIDI instruments
- Automation tasks requiring human interface simulation

Comparison with other Arduino boards
There are egregious distinctions between the Arduino Leonardo and other boards in the Arduino family. The Leonardo excels at introductory USB capability and does not bear an fresh USB periodical motor, in discrepancy to further conventional boards like the Uno and Mega. This simplification not only reduces costs but also enables the Leonardo to function as a keyboard or mouse emulator—an unparalleled feature absent in most other Arduino models. Additionally, the Leonardo's ATmega32u4 microcontroller operates at 5V, contrasting with the 3.3V operation of some Arduino variants, impacting compatibility with certain shields and peripherals.
Setting Up Arduino Leonardo
A. Hardware requirements
It's crucial to obtain the necessary hardware parts before beginning the setup process. The Arduino Leonardo board itself, a USB connector (often standard USB-A-micro USB), and a computer running an operating system compatible with the Arduino IDE are required in order to set it up. It is also advised to have access to a reliable power source in order to guarantee continuous testing and programming. You can now proceed with configuring your Arduino Leonardo for programming and experimentation after assembling these parts.
B. Installing Arduino IDE and drivers
An essential part of configuring the Arduino Leonardo is installing the drivers and the Arduino Integrated Development Environment(IDE). The Arduino IDE is the main software tool used to write, construct, and upload law to the Leonardo microcontroller. It's compatible with Windows, macOS, Linux, and other operating systems and can be downloaded for free from the Arduino website. The IDE might need further drivers after they have been downloaded and installed in order to enable communication between the computer and the Leonardo board. These drivers can typically be installed automatically by the IDE or manually by following the provided instructions.
C. Connecting Arduino Leonardo to computer
After everything is set up, connect the Arduino Leonardo to your computer to start programming and experimenting with your design. Attach the USB cable's one end to the Leonardo board's micro USB connector and the other end to an available USB harborage on your computer. Once the connection is made, the computer should identify the Leonardo as a USB device and the Arduino IDE as a programmable board. With the hardware configured and the IDE ready, it's time to unleash your creativity and finish your Arduino Leonardo project.
Writing Your First Sketch
A. Explaining the sketch structure
Understanding the structure of an Arduino sketch is fundamental before diving into coding. A sketch in Arduino is essentially a program written in the C or C++ programming language. It consists of two essential functions: setup() and loop(). The setup() function is executed once when the Arduino board is powered on or reset, used for initializing variables, pin modes, and libraries. The loop() function, as the name suggests, runs continuously after setup(), executing the main logic of the program. By comprehending this structure, you can organize your code efficiently and effectively implement various functionalities in your Arduino projects.
B. Basic LED blinking example
In this case, one of the digital pins on the Arduino Leonardo controls the LED. Before attaching the LED to any of the digital pins on the Leonardo board—like pin 13—make sure its polarity is right. Next, set the digital pin as an output using setup()'s pinMode function. Next, change the state of the digital pin from HIGH to LOW using digitalWrite in the loop method with the proper delay interval. This straightforward example serves as a stepping stone for understanding digital output and basic control structures in Arduino programming.
C. Uploading the sketch to Arduino Leonardo
The final step to see the code executed in real time is to upload a sketch to the Arduino Leonardo. Make sure the Arduino IDE has loaded and that the sketch is opened before uploading a sketch and that the Leonardo board is connected to the PC via USB. Next, from the IDE's 'Tools' menu, choose the appropriate board and port. Compile and submit the sketch to the Leonardo board by clicking the 'submit' button or by pressing Ctrl + U. The on-board LED, which is often attached to pin 13, will blink rapidly during this procedure to let you know that the upload is happening. When the sketch is finished, the Arduino Leonardo will start to operate, showcasing the extent of its programming abilities.
Exploring Input and Output
A. Utilizing digital and analog pins
Your Arduino project's digital and analog pins let it to communicate with the outside world. Digital pins can be used for reading digital sensors and turning on and off LEDs, among other effects, because they can be set to HIGH(5V) or LOW(0V). On the other hand, because analogue legs can read analogue voltage situations, they're constantly employed with sensors that give nonstop data, similar as light and temperature sensors. Your Arduino Leonardo project's capabilities can be expanded by successfully utilizing digital and analog pins to communicate with a variety of devices and sensors.
B. Interfacing with sensors and actuators
The integration of sensors and selectors to collect environmental data and manipulate palpable particulars is the foundation of numerous Arduino systems. colorful kinds of sensors, similar as temperature, motion, and propinquity sensors, offer distinct perspectives of the surroundings. Again, actuators can be used to control physical factors like motors, servos, and relays to make dynamic and interactive systems. By learning how to work with sensors and selectors, you may produce systems that range from environmental monitoring systems to robot prototypes, and you can also let your creativity run wild.
C. Controlling external devices
The ability of Arduino projects to control external devices is what really makes them brilliant. With the Arduino Leonardo, you may control a wide range of external devices by setting an alarm, turning on a motor, or turning on a lightbulb. Digital outputs can be used to operate relays to switch powerful loads, pulse width modulation (PWM) outputs can be used to control motor speed, and SPI and I2C communication protocols can be used to connect to other microcontrollers and devices. The endless possibilities provided by seamless control of home IoT applications, interactive installations, and external automation devices enable perfection and sophistication.
Conclusion
In conclusion, the Arduino Leonardo has shown to be an effective tool for fans of electronic products, providing a range of I/O options, simple programming, and fundamental USB capabilities. We have examined the setup procedure and essential components during this investigation, emphasizing its significance in the field of electronic prototyping. Understanding the sketch structure, utilizing input/output pins showcase the Leonardo's potential for innovation and creativity.
Final Thoughts
Ultimately, it is impossible to overstate the Arduino Leonardo's adaptability. Its significance in the field of electronics and innovation is highlighted by its capacity to function as a platform for robots, sensor-based projects, keyboard emulation, and more. Leonardo consistently improves its capacity to help people and teams realize their ideas through instructional initiatives and expert prototyping. The Arduino Leonardo is a dependable and indispensable tool for producers, engineers, educators, and hobbyists alike, helping to shape the future of electronic products one project at a time as technology advances and new difficulties appear.
Related Articles
Comparing FPGA vs Microcontroller: Optimal for Your Needs?
Differences Between FPGA vs Microcontroller
8051 Microcontroller:Features,Applications and Types
ESP32 vs ESP8266 Microcontroller: Which One Should You Choose?


