


What Arduino Nano Board is and how it works
This article provides detailed information about the Arduino Nano board, a microcontroller board designed by the Arduino team. This board utilizes the Atmega168 or Atmega328p microcontroller. While it shares many similarities with the Arduino Uno board, its smaller size and unique pin configuration and features have made it a popular replacement for the Uno, especially in embedded systems where compact components are preferred. Arduino boards are primarily used for building electronic projects, embedded systems, robotics, etc. The Nano board, in particular, is introduced for beginners who may not have a technical background.
What is an Arduino Nano Board?
Arduino Nano is a type of microcontroller board designed by Arduino.cc, built with a microcontroller like the Atmega328, which is also used in the Arduino UNO. This board is small and flexible, suitable for a wide range of applications. Other Arduino boards include Arduino Mega, Arduino Pro Mini, Arduino UNO, Arduino YUN, Arduino Lilypad, Arduino Leonardo, and Arduino Due. Additionally, other development boards are the AVR Development Board, PIC Development Board, Raspberry Pi, Intel Edison, MSP430 Launchpad, and ESP32 board.
The Arduino Nano board offers many functions and features similar to the Arduino Duemilanove board but differs in packaging. It lacks a DC jack, so power is supplied through a small USB port or directly to the VCC and GND pins. This board can be powered with 6 to 20 volts via the mini USB port on the board.
Arduino Nano Features
The features of an Arduino Nano mainly include the following:
- ATmega328P Microcontroller from the 8-bit AVR family
- Operating voltage: 5V
- Input voltage (Vin): 7V to 12V
- Input/Output Pins: 22
- Analog input pins: 6 (A0 to A5)
- Digital pins: 14
- Power consumption: 19 mA
- I/O pins DC Current: 40 mA
- Flash memory: 32 KB
- SRAM: 2 KB
- EEPROM: 1 KB
- Clock speed: 16 MHz
- Weight: 7g
- Size of the printed circuit board: 18 x 45mm
- Supports three communication protocols: SPI, IIC, and USART
Arduino Nano Pinout
The pin configuration of the Arduino Nano is shown below, with each pin's functionality discussed.
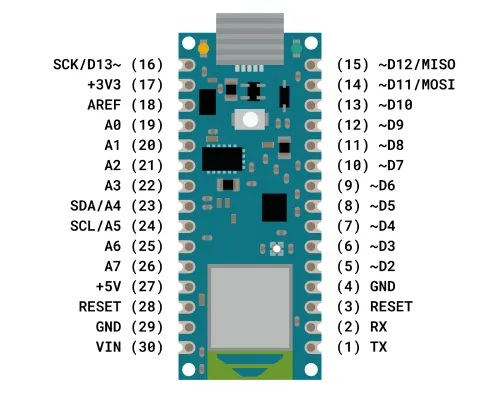
Power Pins (Vin, 3.3V, 5V, GND):
- Vin: The input voltage of the board, used when an external power source from 7V to 12V is applied.
- 5V: The regulated power supply voltage of the Nano board, used to power the board and its components.
- 3.3V: The minimum voltage generated from the voltage regulator on the board.
- GND: The ground pin of the board.
- RST Pin (Reset): Used to reset the microcontroller.
- Analog Pins (A0-A7): Used to read the analog voltage within the range of 0V to 5V.
- I/O Pins (Digital Pins D0 – D13): Used as input or output pins (0V & 5V).
- Serial Pins (Tx, Rx): Used to transmit and receive TTL serial data.
- External Interrupts (2, 3): Used to activate an interrupt.
- PWM (3, 5, 6, 9, 11): Provide 8-bit PWM output.
- SPI (10, 11, 12, 13): Support SPI communication.
- Inbuilt LED (13): Used to activate the onboard LED.
- IIC (A4, A5): Support TWI communication.
- AREF: Provides a reference voltage for the input voltage.
Difference between Arduino UNO and Arduino Nano
The following is a brief comparison of the Arduino UNO and the Arduino Nano:
- Size: The Arduino UNO is larger than the Nano. The Nano measures roughly 2.5 inches by 0.8 inches, while the UNO is approximately 2.7 inches by 2.1 inches.
- Pin Layouts: The pin layouts of the UNO and Nano are different. The UNO has 14 digital I/O pins, six analog inputs, and several additional pins for programming, power, and communication. The Nano has similar power and communication pins, 8 analog inputs, and 22 digital I/O pins.
- Power: The UNO features a DC power port and can be powered by an external power source or a USB connection. In contrast, the Nano can only be powered by a USB connection or an external power source, as it lacks a DC power port.
- Common Features: Both the UNO and Nano include a microcontroller, a clock crystal, and a USB port. However, the Nano has a tiny USB connector and a power jack, while the UNO also includes a power jack and an ICSP header.
- Compatibility: Both units are compatible with a wide range of sensors and actuators and can be programmed and controlled using the Arduino Integrated Development Environment (IDE).
- Price: The Nano is generally less expensive than the UNO.
It’s worth noting that while both boards have similar features, the choice between them depends on the specific requirements of the project and the available resources.
Applications of Arduino Uno and Arduino Nano
The Arduino UNO and Nano boards have in-built microcontrollers based on the ATmega328 microcontroller, making them suitable for numerous applications:
- Device Control: Both boards can be used to control devices such as LEDs, motors, and LCD displays. They are also compatible with electronic shields and other expansion boards.
- Sensor Interface: The analog and digital input/output (I/O) pins on these boards can interface with sensors and other devices to acquire and measure data.
- Common Applications: Home automation systems, weather stations, and remote monitoring systems are typical applications for these boards.
- Easy Prototyping: Their popularity in various electronic projects is due to their ease of prototyping and integration with other electronics and microcontrollers.
- Robotics: These boards are used for building and controlling robots, either as standalone microcontroller boards or as part of a larger system.
Arduino Nano Communication
Communication with an Arduino Nano board can be achieved through various sources, such as an additional Arduino board, a computer, or microcontrollers. The ATmega328 microcontroller used in the Nano board offers serial communication (UART TTL), accessible via the digital pins TX and RX. The Arduino software includes a serial monitor that facilitates the easy transmission and reception of textual information from the board.
The TX and RX LEDs on the Nano board blink whenever data is sent through the FTDI and USB link to the computer. The SoftwareSerial library allows for serial communication on any of the digital pins on the board. Additionally, the microcontroller supports SPI and I2C (TWI) communication.
Arduino Nano Programming
Programming an Arduino Nano can be done using the Arduino software. By selecting the Nano board under the Tools menu, you can start coding. The ATmega328 microcontroller on the Nano board comes preprogrammed with a bootloader, allowing new code uploads without an external hardware programmer. Communication is done using the STK500 protocol. The bootloader can be bypassed, and the microcontroller can be programmed using the in-circuit serial programming header (ICSP) with an Arduino ISP.
Applications of Arduino Nano
Arduino Nano boards are used to build projects by reading inputs from a sensor, button, or finger and providing outputs such as turning on a motor or LED. Some of the applications include:
- Samples of electronic systems and products
- Automation
- Various DIY projects
- Control systems
- Embedded systems
- Robotics
- Instrumentation
Thus, this is an overview of the Arduino Nano datasheet. From the above information, we can conclude that for beginners who are new to electronics, the Nano board is highly recommended due to its features like low cost and ease of use in various applications. This board can easily connect to any computer through its mini USB port. Here is a question for you: What is an Arduino Nano driver?


