


L298 N Motor Driver Module: Dual H-Bridge Control for Arduino
Introduction
One of the most basic yet most useful tasks of the electronics and microcontroller world is controlling motors. Whether it is a robot construction, a smart car, or even the conveyor belt system, you cannot go without the functionality of directing and speed controlled by the motor. This is where the motor driver modules, such as the L298N, come on.
L298N Motor Driver Module is an easy-to-use and versatile dual H-bridge controller board that is meant to connect to a microcontroller such as Arduino, Raspberry Pi and so on. This Board gives comprehensive and dependable motor control because it can operate two DC motors separately or one stepper motor. So, here is a guide on everything you should know about the use of L298N in your Arduino projects, the easy pinouts, wiring, coding and projects of L298N in the real world.
What Is the L298N Motor Driver Module?
The L298N module is derived from the L298N integrated circuit, a full bridge dual motor driver produced by STMicroelectronics. It can drive the speed and direction of 2 DC motors or drive 1 stepper motor with standard logic-level inputs to a microcontroller.
Key Features:
- Dual H-bridge configuration for bidirectional control
- Operates from 5V to 35V supply voltage
- Can handle up to 2A current per channel
- Built-in heatsink for heat dissipation
- Onboard 5V regulator (can power Arduino when the jumper is in place)
How Does Dual H-Bridge Motor Control Work?
The essence of the L298N is the two H-bridges. An H-bridge is an electronic circuit that allows a voltage to be applied across a load (such as a motor) polarity-reversible. This is essential in enabling two-way motor movement.
Every H bridge includes four switching devices (transistors), connected in the form of an H. Appropriate switching (on or off) of these transistors allows reversing current flow in the motor so the motor may turn forward or backward.
Benefits of Dual H-Bridge:
- Control two motors independently
- Forward/reverse control for each motor
- Enables use with stepper motors by alternating coil activation
- Supports PWM speed control
Pinout and Wiring Guide for Arduino
The pin configuration of the L298N motor driver is also a key that needs to be understood for its successful setup. The following is a breakup of the standard pins and terminals on the module:
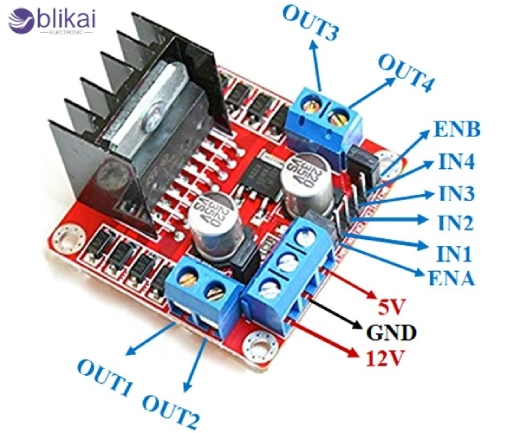
Pin Descriptions:
- IN1, IN2: Logic control for Motor A
- IN3, IN4: Logic control for Motor B
- ENA: Enable pin for Motor A (connect to PWM for speed control)
- ENB: Enable pin for Motor B
- VCC: Motor power supply (up to 35V)
- GND: Ground
- 5V: Optional regulated output (if the onboard regulator is enabled)
Basic Wiring to Arduino:
- Arduino Pin → L298N Module
- D5 (PWM) → ENA
- D4 → IN1
- D3 → IN2
- 5V → 5V (if jumper enabled) or leave unconnected
- GND → GND
For motor B, simply connect:
- D6 (PWM) → ENB
- D7 → IN3
- D8 → IN4
Applications and Use Cases
The flexibility and durability of the L298N motor driver board are a common ingredient in millions of Arduino projects. In the next section, we take a closer look at various categories of applications and how the dual H-bridge architecture can be used to enable a variety of motion control.
1. Mobile Robotics
Differential Drive Robots
Two independently controlled wheels allow robots to turn in place, follow lines, or navigate obstacle courses. By varying PWM values on ENA/ENB, you can implement smooth curves and speed ramps.
Omni-Directional and Mecanum Robots
When combined with four L298N motor driver modules or an ominous multi-driver board, you can use four uni-directional motors to move the robot in four independent directions to give it complete 360-degree motion - the kind of thing that might be used in a warehouse AGV or research applications.
2. Automated Vehicles & Drones
RC Car Conversions
Swap out stock ESCs for L298N modules to gain bidirectional control via Arduino, integrate ultrasonic sensors for obstacle avoidance, or add Bluetooth modules for smartphone control.
Ground Drones/UGVs
In robotics competitions (e.g., the FIRST Tech Challenge), L298N drivers are used to drive traction motors, incorporate PID speed loop control and add encoders to enable accurate measurements of distance traveled.
3. Conveyor and Material Handling Systems
Factory Prototypes & DIY Lines
Use stepper motors driven by the L298N to move products along a short conveyor coordinated by an Arduino “PLC.” Add photo-eye sensors and limit switches for synchronized start/stop actions.
3D Printer and CNC Feed Mechanisms
Although more advanced stepper drivers exist, small desktop CNC or DIY 3D printers can use an L298N to control the X- and Y-axis feed motors in low-load scenarios.
4. Precision Positioning & Motion Control
Pan-Tilt Camera Mounts
To install a remote-controlled camera gimbal, you should take two miniature DC or stepper motors and apply limit switches to them. The PWM should be used to produce smooth panning speed and the digital input to end stops.
Automated Solar Trackers
To install a remote-controlled camera gimbal, you should take two miniature DC or stepper motors and apply limit switches to them. The PWM should be used to produce smooth panning speed and the digital input to end stops.
5. Educational & STEM Projects
Beginner Electronics Kits
Many maker kits and STEM classes include an L298N module because it clearly demonstrates H-bridge theory, PWM control, and wiring best practices.
Control Theory Demonstrations
To learn in the field of PID tuning, universities are applying L298N-drawn carts or pendulum systems, where the students may directly observe the output of proportion, integral, and derivative gains.
6. Wearable & Assistive Devices
Motorized Prosthetics Prototypes
For low-torque prototypes, the dual-motor control enables independent flexion/extension of joints. Arduino code can implement simple myoelectric control loops.
Automated Wheelchair Attachments
Retrofit manual wheelchairs to have small drive motors operated by an Arduino joystick module, which provide mobility support in indoor settings.
7. Smart Home & IoT Integrations
Automated Curtains & Windows
Use DC motors to drive curtain tracks or window actuators. Open/close using Wi-Fi-enabled Arduinos (ESP8266/ESP32) and schedule rental openings/closures using data coming via the light sensor or time.
Pet Feeders & Aquaponics
Use control auger motors to give exact rations of foods or water pumps on time-gauged patterns in miniaturized hydroponic systems.
Tips, Troubleshooting, and Safety Notes
Tips for Best Performance:
- When high-current motors are being driven, always add a heatsink to prevent a thermal shutdown.
- When motors need higher voltages, do it in separate channels.
- Remember, the 5V jumper should be removed when ballasting the L298N with anything over 12V to avoid damage to the onboard regulator.
Common Issues and Solutions:
|
Issue |
Possible Cause |
Solution |
|
Motors not spinning |
Incorrect wiring or missing power |
Double-check IN/EN connections and VCC |
|
Only one direction working |
Logic signals improperly set |
Verify HIGH/LOW state on IN1/IN2 |
|
Overheating |
Excessive motor load |
Add heatsink, reduce current draw |
|
Arduino resets during use |
Motor noise feeding back |
Use decoupling capacitors and diodes |
Conclusion
L298N Motor Driver Module is a small and efficient yet user-friendly module to drive motors using Arduino and other orders of microcontrollers. Its two H-bridges and two shared supplies enable it to power two DC motors or a stepper motor with fine positioning speed and direction control.


