


How to Check a Fuse with a Multimeter [Electronic Components Guide]
A fuse is a vital point in electrical and electronic systems because it cuts off the current when it becomes too high. Occasionally, if a fuse blows, your device wo n’t work presently. Fortunately, you only need a multimeter to easily check a fuse. It provides you with easy-to-follow instructions to test your fuse.
Introduction
Fuses make sure the safety of all electrical and electronic devices is maintained. If the current becomes higher than the acceptable level, the fuse will break the electricity connection, sparing the corridor from any fire damage. How do you identify that a fuse has burned? The easiest way to test it is to use a multimeter. We will explain how to use a multimeter to check a fuse and tell you how to do it cautiously.
What Is a Fuse?
A fuse is used to prevent too much current from flowing in an electrical circuit. It is built with a small wire in a case that burns away once the current gets too high. Fuses are found in cars, home appliances, equipment in factories and electronic gadgets.
Common Types of Fuses
Glass Fuses
These are the old-school fuses most people recognize. They're clear tubes with metal caps on both ends and a visible wire inside. When too much current flows, that wire heats up and breaks - you can actually see it's blown just by looking at it. Glass fuses come in different sizes, like 5×20mm (common in Europe) and 1/4" × 1-1/4" (the standard in North America).
Blade Fuses
To find your car fuses, open the hood, and you’ll observe them next to the battery. Their main advantage is that they can be replaced easily and without special tools in cars. Different amperage ratings have their color – 20A has yellow, 30A has green and so on. Because of the shape, you can quickly pick out your oil and check whether you’re car-savvy or not.
Resettable Fuses (PTC)
Unlike traditional fuses that need replacement after blowing, these clever devices reset themselves after cooling down. They're actually polymers that dramatically increase resistance when they get hot from overcurrent. Once the problem is fixed and they cool off, they return to normal operation. Pretty neat, right?
SMD Fuses
These tiny surface-mount fuses sit directly on circuit boards in your smartphones, laptops, and other compact electronics. They're microscopic compared to other fuses but serve the same purpose. The catch? When these blow, you're probably not replacing them yourself unless you've got serious soldering skills and a microscope.
Ceramic Fuses
These glasses are for the hottest weather. Since ceramic fuses can tolerate more heat and current than glass fuses, they’re ideal for worker settings. The pottery can stay strong as the firing takes place and the internal element melts.

Signs of a Blown Fuse
Before checking the fuse with a multimeter, inspect it to see if any part is blown:
- The metal strip inside the fuse is broken or melted.
- Dark burn marks or discoloration inside the glass casing.
- The device or circuit no longer functions as expected.
Tools You Need
To test a fuse accurately, you’ll need:
- Digital or Analog Multimeter – for continuity or resistance testing.
- Fuse Puller or Tweezers – optional, helps remove fuses safely.
- Protective gloves – optional, for added safety.
Step-by-Step Guide to Checking a Fuse with a Multimeter
Step 1: Power Off the Device
Before checking a fuse, ensure that the device is fully powered off and unclogged. This is pivotal for your safety and prevents any damage to the multimeter or circuit.
Step 2: Remove the Fuse
Locate and carefully remove the fuse from its holder. Some fuses are in clips or screw-in types, while others might be mounted on a PCB. Use proper tools if necessary to avoid damage.
Step 3: Set the Multimeter to Continuity or Ohms
- On a digital multimeter, turn the dial to the continuity mode( frequently pronounced with a sound surge or diode symbol). Alternatively, you can use the resistance( Ω) setting.
- On an analog multimeter, set it to the lowest resistance range (e.g., ×1 ohms).
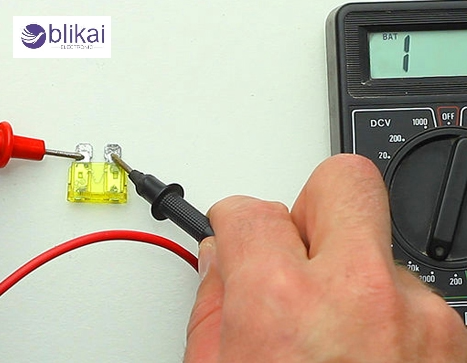
Step 4: Test the Fuse
Touch one probe to each end of the fuse:
If using continuity mode:
A beep or 0 reading on the screen indicates the fuse is good.
No beep or OL (over-limit) indicates the fuse is blown.
If using the resistance mode:
A reading close to 0 ohms means the fuse is good.
A very high resistance or infinite reading means the fuse is blown.
Step 5: Replace If Necessary
However, replace it with one that has the same type, voltage rating, If the fuse is blown. norway substitute a fuse with a different standing, as it can damage your device or beget a safety hazard.
Tips for Accurate Testing
- Always remove the fuse from the circuit before testing, if possible.
- Compare with a known good fuse for verification.
- Avoid touching the metal probes with your fingers while testing to prevent resistance interference.
- Store spare fuses in a labeled container for easy access.
Frequently Asked Questions (FAQ)
Can I test a fuse without removing it?
Yes, but it's less accurate. Other components in the circuit can affect the reading.
Which multimeter setting should I use?
Use continuity mode for quick checks. Use resistance mode for more detailed analysis.
What does “OL” mean on my multimeter?
“OL” stands for “open loop” or infinite resistance. This usually indicates a blown fuse.
Can a fuse look fine but still be blown?
Yes, especially with ceramic or surface-mount fuses. That’s why testing with a multimeter is essential.
How to test a fuse without a multimeter?
Use a test light or visually inspect the fuse for a broken wire inside.
How to check fuses without removing them?
Use a fuse tester or multimeter probes on the exposed test points on top of the fuse.
How to test a fuse with a Fluke Multimeter?
Test for continuity or resistance with the Fluke multimeter; if you hear a beep or see nearly zero ohms on screen, the fuse is working.
How to test a 30-amp fuse with a multimeter?
Turn the multimeter to durability mode, check for low resistance between the two outputs of the 30A fuse to ensure it's good.
How to test a cartridge fuse with a multimeter?
As soon as you take out the cartridge fuse, set the multimeter to durability or ohms and check between the fuse’s ends.
How to test a car fuse with a multimeter?
With the car off, set the multimeter to continuity or voltage mode, and touch both test points on the fuse—continuity or equal voltage on both sides means it’s working.
How to check a fuse with a multimeter without removing it?
Touch the multimeter probes to the two exposed metal tips on top of the fuse—if both show voltage or continuity, the fuse is good.
How to check the continuity of a fuse?
Place the black inquiry on the end of the fuse and the red inquiry on the other end, and if you can hear the multimeter beep, the fuse is good.
Conclusion
Testing a fuse with a multimeter takes only a little time and is generally helpful. After learning about fuses and using a multimeter, you can take care of your lines and ensure the safety of your devices. Should you question a certain product, the stylish thing to do is consult a technician.
Related Articles
How Does a Fuse Work? [Full Guide]
Is a Fuse a Resistor? [Everything Explained]
What is an Electronic Fuse? All You Need to Know
Step-by-Step Guide to Replacing a Temperature Fuse
Understanding Thermal Fuse: Function, Applications, and Safety Tips
Inrush Current Limiter Guide: Types, Function & Applications


