


How to Test a Potentiometer with a Multimeter [Guide]
Potentiometers are a basic electronic circuit component, commonly used to adjust the parameters, such as volume, brightness level, or signal level. Although they are simply designed, they can break down or eventually wear out after some time. When fixing an old stereo, designing a prototype, or just learning how electronics work, it is good to know how to test a potentiometer using a multimeter to make sure that it is in good working condition.
Why Testing a Potentiometer Matters
A potentiometer (often abbreviated as "pot") is a type of variable resistor with three terminals. It allows for manual adjustment of resistance, enabling changes in voltage within a circuit. This makes it incredibly useful in countless applications, including:
- Volume control in audio devices
- Brightness tuning in LED lighting
- Speed adjustment in motor controllers
- Analog signal calibration in sensors
But as with any other mechanical part, potentiometers are subject to failure, whether in the form of dirt and corrosion, wear and tear or internal tracking damage. A bad potentiometer may lead to unstable behavior and sound, noise, or controls that will not respond.
Hence, measurement of the potentiometer with a multimeter is a very important step in the reliability of the system before installation and maintenance.
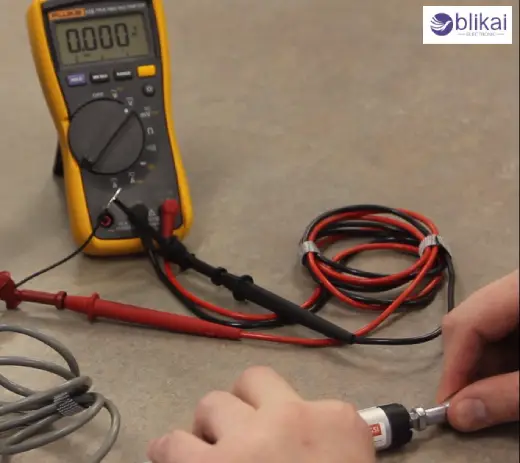
Tools Required for Testing
Before beginning the test, gather the following tools:
- Digital multimeter (preferred for precise and fast resistance readings)
- Analog multimeter (also suitable but less accurate)
- The potentiometer you want to test
- Optional tools: breadboard, jumper wire or a soldering iron (in case the potentiometer is soldered on a circuit board)
Ensure that the multimeter is in good working condition with a good battery. When you are testing a potentiometer in a live circuit, make sure you power down and discharge any capacitors to remain safe.
Understanding Potentiometer Terminals
To effectively test a potentiometer, you must first understand its terminal layout. A standard potentiometer has three terminals:
Terminal A (Pin 1): One fixed end of the resistive element
Terminal B (Pin 2 or center pin): The adjustable wiper that moves along the resistive track
Terminal C (Pin 3): The other fixed end of the resistive element
When you turn the shaft of the potentiometer, it changes the resistance from average across that wiper and each of the two fixed plates.
By doing this, you will also be able to employ the potentiometer as a rheostat (variable resistor in 2 2-terminal configuration) or a voltage divider (with 3 terminals).
How to Test Total Resistance (Between Fixed Terminals)
In this test, the accuracy of the total resistance of the potentiometer is determined with respect to the rated value.
Steps:
- Change the range of your multimeter to an appropriate value of resistance (e.g., 20k on the multimeter to a 10k pot).
- Connect the multimeter red probe to Terminal A and the black probe to Terminal C (The two outside terminals).
- Check the value of the resistance on the screen.
Expected Result:
- The resistance must be very near to its rated value (e.g., a 10k resistor should be observed to have something near 9.8 to 10.2k).
- When the reading is high or indicates OL ( over limit), this can be due to open circuit or resistive track damage.
- When the value is changing and probes are kept constant, there are internal breaks or corrosion on the potentiometer.
It is to be done when no potentiometer is used in the circuit because any other components could influence the work of this test.
How to Test Variable Resistance (Wiper Functionality)
You have now checked the total resistance; now check, using a high range, to see that the wiper (center pin) is moving freely and also varying resistance as it should.
Steps:
- Apply one probe on Terminal A (or C) and the other one on Terminal B (the wiper).
- Gradually remove the potentiometer knob and then back to its original position.
- Note the opposition as the resistance turns.
What You Should See:
- The resistance ought to vary continuously and gradually, between nearly 0 and the maximum resistance (or the reverse).
- When resistance suddenly jumps, skips or drops to 0 during a rotation, the wiper is likely to be broken or down in a dirty state.
- Make the same test from Terminal C to Terminal B to check the opposite half of the resistive range.
This test will make sure that the potentiometer is doing this and is controlling the correct amount of voltage or current that it is supposed to be doing in its application.
In-Circuit vs. Out-of-Circuit Testing
A potentiometer can be tested; however, it can be in a circuit, but other parts (resistors or capacitors) in the circuit can alter the readings.
In-Circuit Testing:
- Advantages: No desoldering required; faster troubleshooting
- Disadvantages: Readings may be distorted due to parallel paths
Out-of-Circuit Testing:
- Advantages: Accurate, reliable readings
- Disadvantages: Requires desoldering or disconnecting the potentiometer
When you are unsure whether the reading is a complex reading or whether the circuit is complex, you can remove your potentiometer to test it in isolation.
Common Potentiometer Issues and Symptoms
Identifying faulty behavior early can prevent system failures or inconsistent performance.
Typical Problems:
Intermittent resistance: Resistance fluctuates erratically even with smooth knob movement
Dead zones: No change in resistance for part of the rotation
Stuck resistance: Value remains constant regardless of rotation
No resistance or infinite reading: Indicates a broken resistive path
Crackling sounds in audio systems: Caused by dirty or worn potentiometer tracks
A damaged potentiometer is generally not repaired, as most of the time, they are required to be replaced instead, except where a high-precision application is involved.
Tips for Accurate Multimeter Testing
To make accurate, end-to-end, repeatable results when testing:
- Disconnect power to avoid damaging your multimeter or the component
- Use sharp, clean probes for good contact
- Avoid touching the metal parts of the probes while measuring
- If you're testing small potentiometers (e.g., trimpots), use clip leads for better stability
- Move the potentiometer shaft slowly to detect jumps or erratic changes
Pro tip: If you don't know the potentiometer's rating, check the body for something like "10K", "100K" or "1M" listings.
Conclusion
Learning how to use a multimeter to test a potentiometer allows you to know when it is functioning properly, how to fix any problem and how to ensure that your electronic projects do not go wrong. Ranging in scope from as simple as performing a resistance check on total resistance to how well the wiper moves, each test indicates the health of this vital component.
Should your potentiometer fail one of the tests, it generally does not cost a fortune to replace and will most likely be easy to do so. In selecting a replacement, the resistance value and taper (linear or logarithmic) must be matched to operate properly.
Frequently Asked Questions (FAQ)
Can I test a potentiometer without removing it from the circuit?
So, yes, except you need to recall that parallel components will bring some interference in your readings. Accuracy may be important, in which case the potentiometer may be tested when out of circuit.
What does it mean if I get infinite resistance across two terminals?
It normally indicates the fault of the resistive path. The reason for this may be internal damage, a damaged terminal or corrosion.
Why does the resistance jump when I rotate the shaft?
This tends to be occasioned by a worn or dirty wiper. Cleaning may sometimes solve the problem, although on most occasions it may prove beneficial to replace the potentiometer completely.
Can I clean a dirty potentiometer?
Just the same (at least so in the case of rotary pots on audio gear). A contact cleaner spray may come in handy, but when cleaning fails to bring in smooth operation, you are encouraged to replace it.
What’s the difference between a linear and logarithmic potentiometer when testing?
Both types behave similarly during testing. However, the rate of resistance change differs—linear pots change resistance at a constant rate, while logarithmic pots change exponentially. This can be seen when observing how fast resistance changes with rotation.
Some images are sourced online. Please contact us for removal if any copyright concerns arise.


